 Save
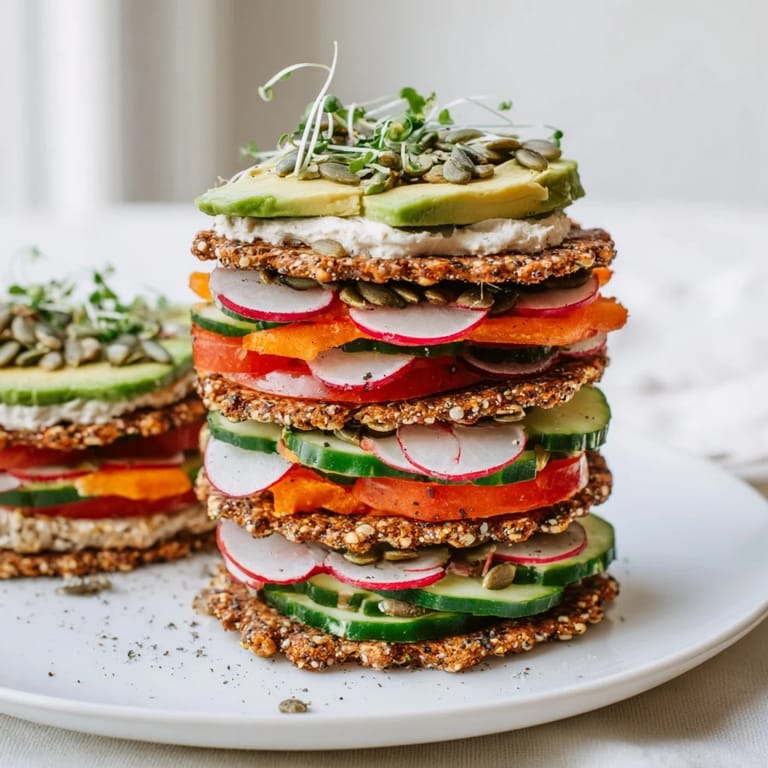
Save I still remember the first time I attempted to create something truly showstopping for a dinner party while respecting my gluten-free guests. I was standing in my kitchen, staring at beautiful ingredients, wondering how to stack them into something that would make everyone gasp when they walked in. That's when the tower concept hit me—why layer things horizontally when you could build them vertically? It felt like edible architecture, and everyone at that table leaned forward with genuine excitement. Now, this gluten-free gourmet tower is my secret weapon for impressing people while proving that dietary restrictions never mean sacrificing style or flavor.
I made these towers for my cousin's birthday brunch, and I watched her face light up when she saw them sitting in the center of the table—tall, vibrant, impossible to ignore. The fact that they were gluten-free seemed almost like a secret bonus, something thoughtful she didn't expect. That's when I realized this dish does more than feed people; it makes them feel seen and celebrated.
Ingredients
- Gluten-free crispbread crackers (12 pieces): These form your solid foundation—choose seed, multigrain, or plain varieties depending on the flavor profile you want. I prefer ones with visible seeds because they add visual interest and a pleasant crunch that holds up beautifully under the weight of all those toppings.
- Gluten-free bread, lightly toasted (8 slices): Toasting is crucial here; it firms up the bread so it won't get soggy when you layer it with all those fresh, moist ingredients. Cut them into rounds or rectangles that roughly match your crackers for a cohesive look.
- Whipped cream cheese (150 g): This acts as an edible glue binding everything together while adding a luxurious creaminess. Whipped cream cheese is your friend because it spreads easily and doesn't require much pressure to go on without crushing your delicate layers.
- Hummus (100 g): A flavor and texture player that adds earthiness and helps lock in moisture. Choose one with olive oil for the best taste, and consider roasted red pepper or garlic varieties for extra dimension.
- Guacamole (100 g): This brings richness and a silky mouthfeel, but here's the secret I learned the hard way—make it right before assembly or toss it with a tiny squeeze of lemon juice to prevent browning.
- Cucumber, thinly sliced (1 small): The crispness and freshness here cut through all the richness like a cool breeze in summer. Slice it thin enough to be delicate but thick enough to hold together.
- Tomato, thinly sliced (1 medium ripe): Choose a tomato at peak ripeness and pat the slices dry before using them—excess moisture is the enemy of a stable tower.
- Avocado, sliced (1 small): Wait to slice this until the very last moment, and if you're making the towers ahead, store the unused avocado with the pit in it to preserve that beautiful green color.
- Microgreens or baby arugula (1/2 cup): These add a peppery bite and visual elegance that makes the whole thing feel restaurant-quality. They're the finishing touch that transforms good into gorgeous.
- Radish, thinly sliced (1/4 cup): These pink and white rounds add a peppery crunch and visual pop that photographs beautifully—plus they stay crisp much longer than softer vegetables.
- Roasted red peppers, sliced (1/4 cup): Use the jarred ones if fresh aren't available; they're pre-cooked and have this beautiful glossy quality that catches the light.
- Toasted pumpkin seeds (2 tbsp): These add nutty flavor, textural contrast, and a professional finishing touch. Toast them yourself if you can—the difference is noticeable.
- Fresh chives, finely chopped (2 tbsp): These should be added at the very end as a garnish; they wilt quickly but add a fresh onion brightness that ties everything together.
- Freshly cracked black pepper and sea salt: Don't skip the fresh cracking—pre-ground pepper tastes tired, and these final seasonings make all the difference when you taste them.
Tired of Takeout? 🥡
Get 10 meals you can make faster than delivery arrives. Seriously.
One email. No spam. Unsubscribe anytime.
Instructions
- Set up your station like you mean it:
- Before you even think about stacking, arrange everything in small bowls in front of you. Toast your gluten-free bread until it's just golden and firm—you want it to provide structure, not crumble. Cut the bread into rounds or rectangles that match your crackers roughly. Having everything ready means you can work quickly, and speed matters when you're building something this delicate.
- Build your first layer:
- Take a cracker as your base and spread it thinly with cream cheese or hummus—not too much, just enough to help the next piece stick. Place your toasted gluten-free bread on top. This cracker-bread-cracker sandwich is the anchor that holds everything else up, so make sure it feels stable before moving forward.
- Create the color magic:
- Now comes the fun part. Spread your chosen topping (guacamole, hummus, or cream cheese) on that bread, then layer on your fresh vegetables—some cucumber and tomato here, maybe some avocado there. Think about color contrast as you go. Reds next to greens, whites next to purples, all building a visual story that makes people want to take a photo before they eat it.
- Stack with intention:
- Place another cracker on top of your vegetables and repeat the whole process—spread, bread, vegetables, press gently. As you build, press down just enough to ensure the layers nestle together without sliding, but not so hard that you crush your fresh vegetables. You're aiming for about three to four layers total, depending on how tall you want your tower to be.
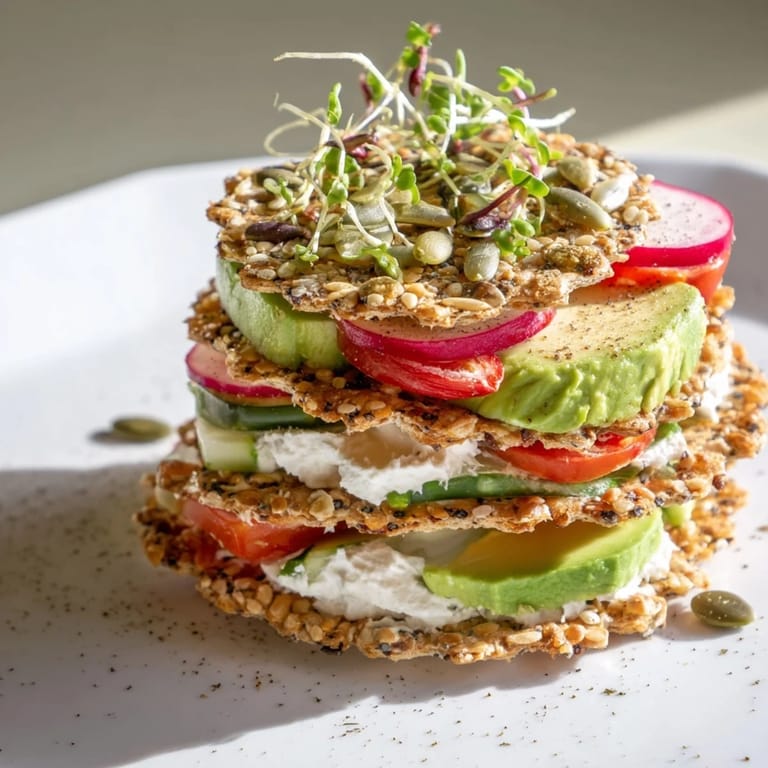
- Crown your creation:
- The top layer should be your most beautiful—a cracker or slice of toasted bread topped with a tiny dollop of cream cheese, a small handful of microgreens, a scatter of toasted pumpkin seeds, and a pinch of fresh chives. Finish with a few cracks of black pepper so everyone can see the care you've taken.
- Transfer with confidence:
- Use a wide spatula to gently slide each tower onto a serving plate. Work slowly and deliberately; this is not the moment to rush. If you're making multiple towers, give them a little space on the plate so they can be admired individually.
- Serve at once:
- These towers are best enjoyed immediately while the bread is still warm and crisp and the fresh vegetables haven't started releasing their water. Your guests should taste the carefully balanced layers, not a soggy mashup.
 Save
Save My friend Sarah sat at my table, took her first bite, and her eyes closed for just a second. She said, 'I didn't think I could have something this beautiful,' and that moment reminded me why I cook. These towers say: I see you, I know about your dietary needs, and they're no excuse to settle for less magic.
Customizing for Your Crowd
The beauty of this tower is that it bends to whatever you're working with. Going plant-based? Swap the cream cheese for a cashew ricotta or just increase the hummus and guacamole—nobody will miss the dairy when those layers taste this good. Want to add protein? Smoked salmon looks stunning between layers, as does paper-thin turkey or grilled vegetables that have been seasoned and cooled. Think about your ingredient list like a painter's palette, where every addition should either add flavor or visual interest, ideally both.
Preparing Ahead Without Losing Your Mind
I've learned that you can prep everything except the actual assembly an hour or two before guests arrive. Toast your bread, slice your vegetables, toast your pumpkin seeds, get your spreads into small bowls. Keep the avocado whole with its pit and only slice it when you're ready to build. This way, you're not stressed when people are supposed to be arriving; you're just doing 15 minutes of calm, focused stacking.
The Secret to Making Them Memorable
These towers work because they engage multiple senses at once—the gorgeous colors that make people pause before eating, the satisfying crunch when you bite through the toasted bread, the peppery bite of radish and arugula cutting through creamy avocado, the salty crunch of pumpkin seeds finishing every bite. It's not one big explosion of flavor; it's a conversation happening in your mouth, and that's what makes people remember them.
- Invest a moment in making your towers visually balanced—think of them as edible art that happens to be delicious
- Don't be afraid to mix in unexpected elements like roasted beets, pomegranate seeds, or crispy shallots if they're gluten-free and sound good to you
- Remember that these are meant to be impressive but not intimidating—they're just stacked snacks that happen to look like you tried, which is exactly what hospitality is about
 Save
Save Every time I make these towers, I'm reminded that gluten-free cooking isn't about restriction—it's about creativity and thoughtfulness. These stacks of color and flavor and crunch prove that the best food is always the food that brings people together, no matter what dietary story they're living.
Recipe FAQ
- → What gluten-free bases are best for layering?
Use crispbread crackers and lightly toasted gluten-free bread cut into rounds or rectangles to provide sturdy and flavorful layers.
- → Which spreads complement the fresh toppings?
Whipped cream cheese, hummus, and guacamole add creamy texture and rich taste that pair well with the crisp vegetables.
- → How can I ensure the tower remains stable?
Press layers gently during assembly and alternate texture and density to maintain balance; a firm base cracker also helps.
- → Can this tower be customized for different diets?
Yes, swap cream cheese for plant-based alternatives for vegan versions, and add proteins like smoked salmon or grilled vegetables if desired.
- → What garnishes enhance flavor and presentation?
Finely chopped chives, toasted pumpkin seeds, microgreens, black pepper, and sea salt add flavor contrast and a finishing touch.